Seamless EVPN-VXLAN Stitching – Verification

Juniper Learning Byte: How to verify seamless EVPN-VXLAN stitching operations
Juniper’s Zach Gibbs walks you through the process of seamless EVPN-VXLAN stitching. This video is most appropriate for users with a high degree of knowledge and skill with data center technologies.
You’ll learn
An example of the topology involved, with two different data centers
How to dive into the topology to make sure things are working correctly
Step-by-step how the verification process works
Who is this for?
Host
Transcript
0:00 [Music]
0:12 hello my name is zach gibbs and i'm a
0:15 content developer within education
0:18 services inside juniper networks and
0:21 today we will be going through the
0:23 seamless evpn vxlan stitching
0:26 verification learning byte
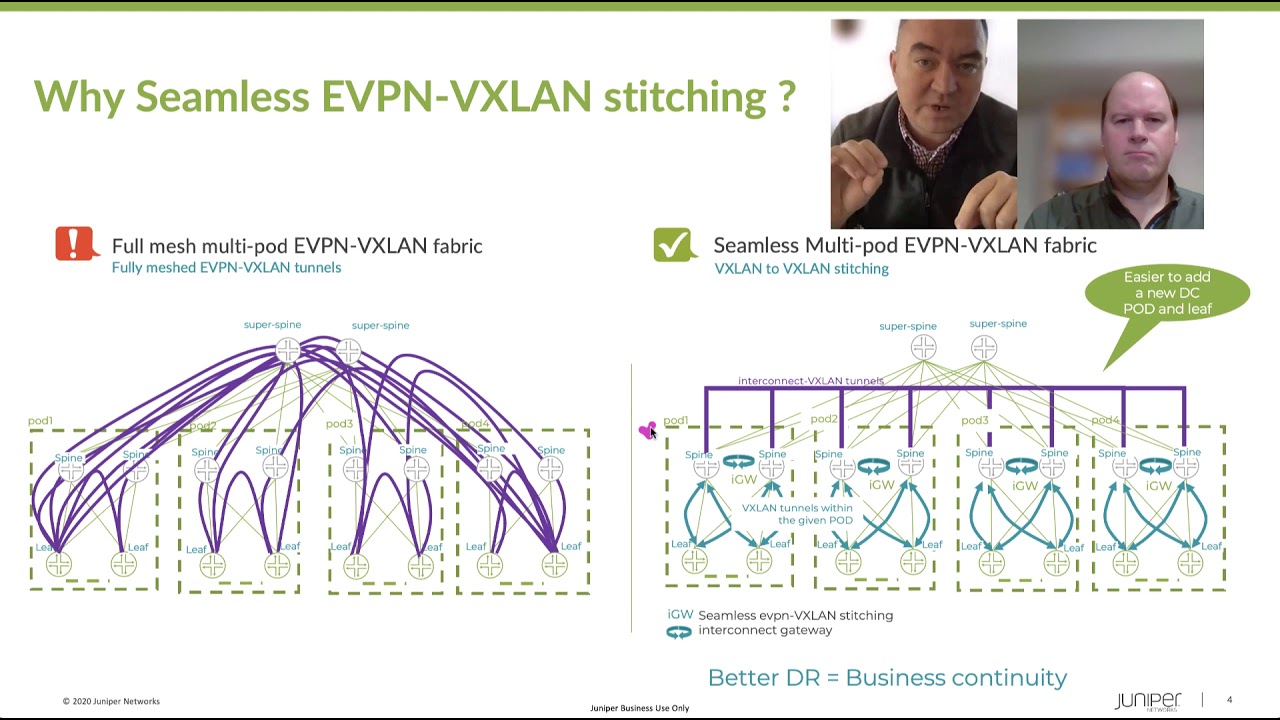
0:28 all right so here is our topology in
0:31 this topology we have two different data
0:33 centers dc1 and dc2
0:36 and then in dc1 we have two qfx devices
0:39 that's spine one and leaf one and then
0:42 we have the host one device and host one
0:44 is a part of vlad10 and uses vni5010
0:49 and you can see the address here is
0:50 10.1.1.1
0:52 it's in that subnet and uses dot one
0:55 and then in dc2 we have spine 2 and leaf
0:58 3 which are qfx devices and then we have
1:01 host 2 which is a part of vlan 10 and
1:03 uses vni 5010 so same vni and vlan as
1:07 host 1.
1:08 and then host 2 here
1:11 uses the 10.1.1.2
1:14 ip address and
1:16 we have
1:17 seamless evpn vxlan stitching configured
1:20 and working
1:22 and if you're interested in the
1:23 configuration i do have other learning
1:25 bytes that go over the configuration so
1:27 please check those out
1:29 and then with this
1:31 so
1:32 it is working and functioning host one
1:35 can communicate with host two
1:37 and so things are working but we want to
1:40 dive into the individual qfx devices and
1:43 make sure that things are working
1:44 correctly
1:46 and so one other thing to point out or
1:48 some other things to point out is the
1:50 loopback addresses of the qfx devices
1:52 spine1 uses 192 168 100.1
1:56 spine 2 uses dot 2. leaf 1 uses diet 11
2:00 and leaf 3 uses dot 13. you can see the
2:02 host addresses here as well we already
2:05 discussed those
2:06 and then we have the interconnect
2:08 vxlan tunnel parameters now this is
2:11 important here that uh you have the esi
2:14 from as you configured on spine1 you see
2:16 it here and spine2 you see it here now
2:19 that's a big those are some big numbers
2:20 to try to memorize but all you have to
2:22 realize is how i name these
2:25 is with the esi with spine1 it's 1 1 1 2
2:28 1 3 1 4 and so forth with spine 2 it's 2
2:32 1 2 2 2 3 2 4 and so forth so keep that
2:34 in mind that'll make it easy to
2:36 recognize which esi interconnect esi
2:39 that is is from spine1 or spine2 and
2:42 then you have the route distinguishers
2:43 here for spine1 and spine2 based off the
2:46 loopback ip addresses for those devices
2:49 and then the route target we see here
2:51 that's the interconnect route target is
2:54 uh target colon one colon one two three
2:56 and then you see the interconnect vni
2:59 that will be shared across the
3:01 interconnect
3:02 vxlan tunnel okay so with that let's go
3:04 ahead and jump to the cli and get this
3:06 started
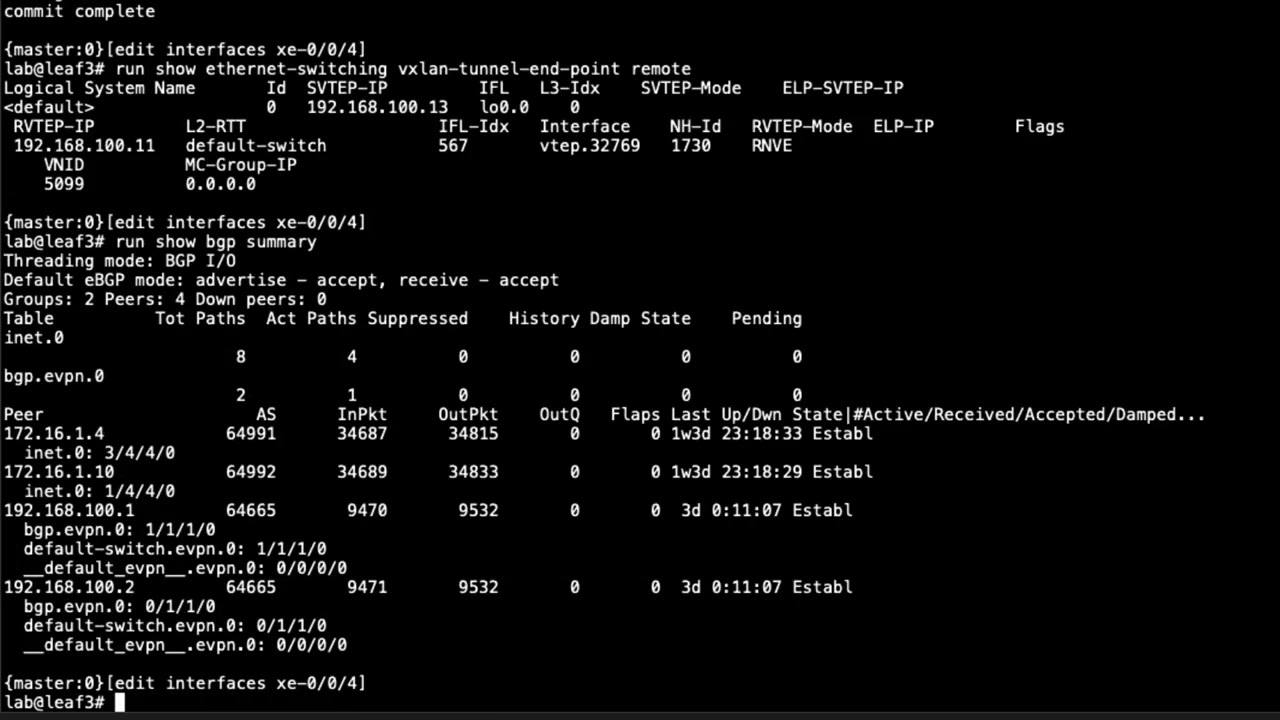
3:08 so here is the cli for leaf one let's
3:11 look at the show ethernet switching
3:13 vxlan tunnel endpoint remote
3:16 command
3:17 and we see some output here
3:19 and let's go through it so we can see
3:21 that
3:22 this is the local address the the local
3:25 anchor point we can see that we're using
3:27 uh interface the loopback interface and
3:30 we see the loopback address that we're
3:32 using for that so that's the ip that's
3:33 associated with the local vxlan tunnel
3:36 anything that starts from there and then
3:38 you can see here that we do have one
3:39 vxlan tunnel coming in
3:41 it's from the spine1 lupec address we
3:44 know that that 182 168 100.1 is that
3:48 spine1 loopback address
3:50 and we see the vtep interface there
3:52 and then we see this mode this mode says
3:54 rnve
3:56 now that tells us it's a regular vxlan
3:58 tunnel and that's exactly what we want
3:59 to see this isn't a
4:02 interconnect vxlan tunnel and when we
4:04 look at spine1 we'll be able to see the
4:06 difference there it won't be rnve for
4:08 the tunnel that goes from spine 1 to
4:10 spine 2. there'll be a tunnel that's
4:11 coming from leaf 1 to spine 1 that will
4:14 show rnve under the rv temp mode field
4:18 so keep that in mind then we can see the
4:20 vni here that is being used and that 5 0
4:22 1 0 that's exactly what we want to see
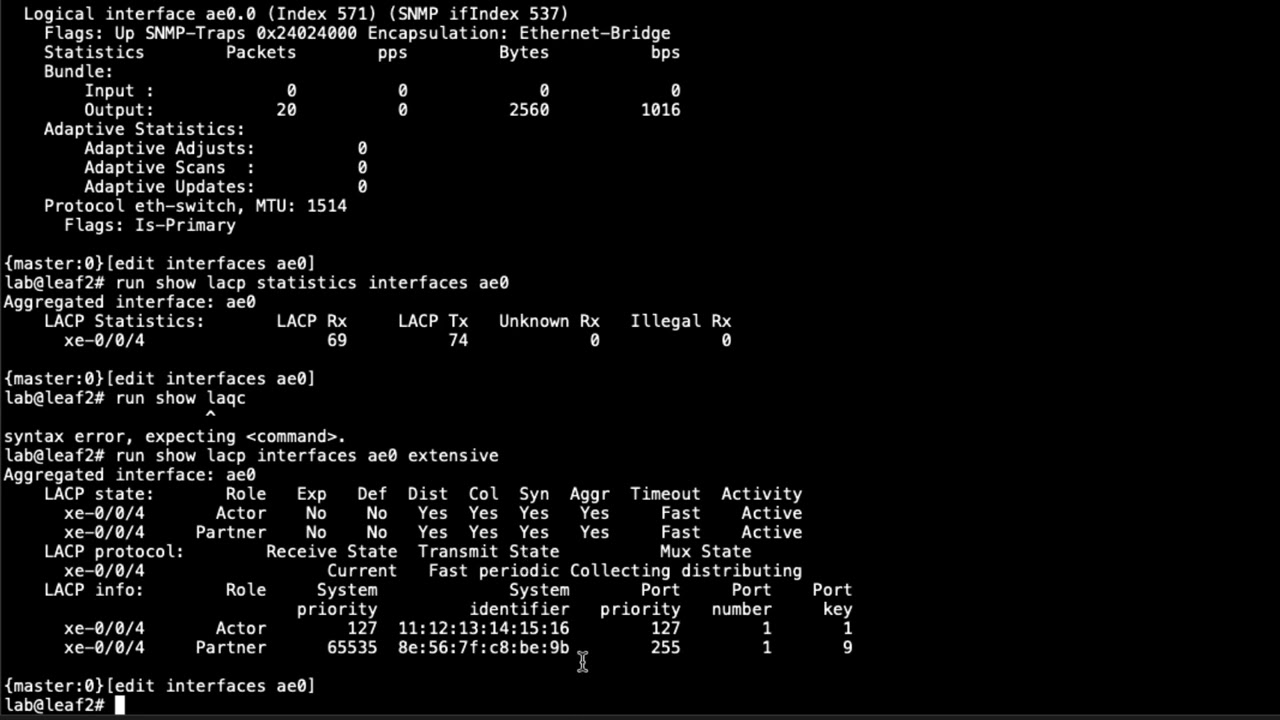
4:25 and then notice the the v tip interface
4:27 we can look at that in more detail to
4:30 see what's happening here and so
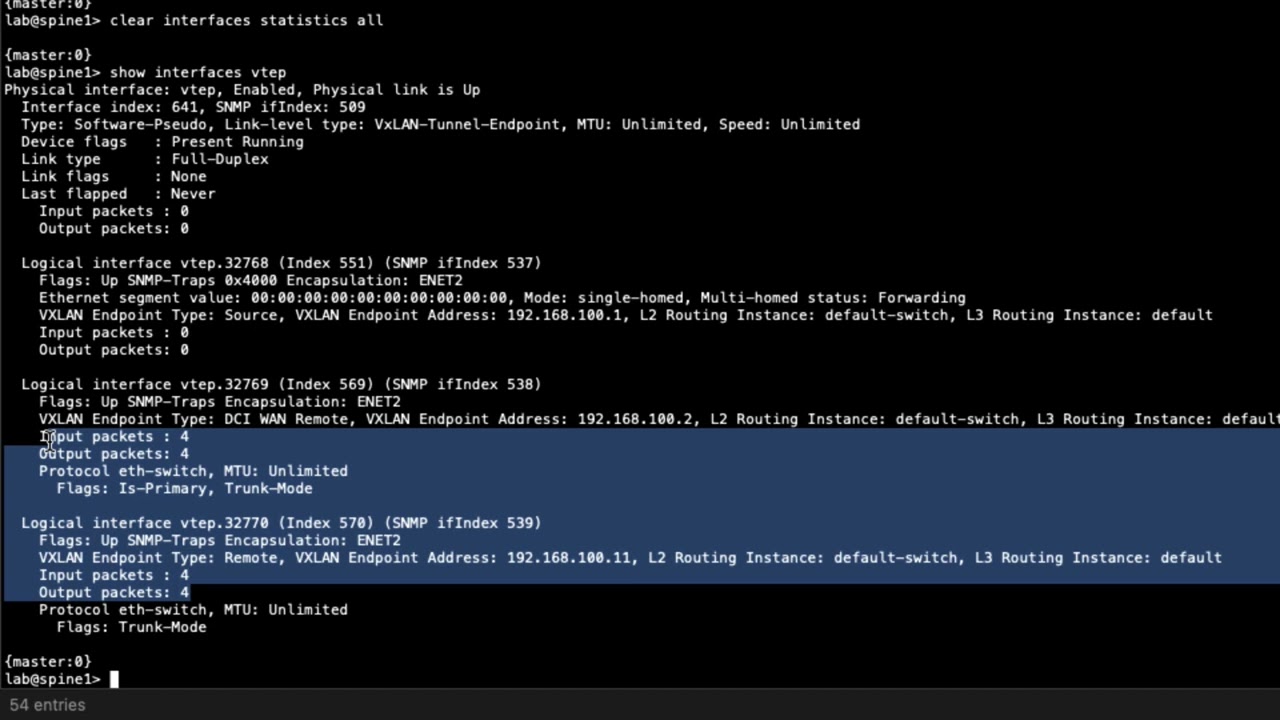
4:32 let's go ahead and clear interface
4:34 statistics just say all
4:37 and then show interfaces vtep
4:40 and there's going to be the vtep
4:42 interface uh the the vtep interface that
4:45 is being used here is the vtep
4:48 32769
4:49 and you can see we have some input and
4:51 output packets let's go ahead and do
4:52 that command again and you can see that
4:54 it's incrementing and that's perfect
4:55 that's what we want to see the traffic
4:56 is currently flowing between host one
4:58 and host two and we can see that it's
5:00 actually going into that vxlan tunnel so
5:03 perfect that's what we want to see
5:05 and so let's go ahead and jump to spine
5:07 one and look at the same thing so let's
5:09 do the
5:10 show ethernet switching vxlan tunnel
5:12 endpoint remote command
5:15 and you can see here we have some more
5:16 information and that's good because we
5:18 have we should be having two vxlan
5:21 tunnels terminate on spine1 which we do
5:24 have so the first one you see here you
5:26 can see the ip address for the rv tab
5:29 ipfilled
5:31 shows that it's spine 2's loopback
5:34 address
5:35 and then we can see the vtep interface
5:37 and that's
5:38 3270 and then we have the when vtep
5:42 output here
5:44 under the rv temp mode fill now if you
5:47 see that that tells you right there that
5:49 it is an interconnect
5:51 vxlan tunnel and because the next output
5:53 you see here this is the loopback
5:55 address of leaf one and you also see in
5:58 here the vtep interface that is
6:00 vtep.32770
6:03 and also under the rvtep mode
6:06 field we have rnve so we know that's
6:09 just a plane vxlan tunnel here is a
6:12 spine two let's do the show ethernet
6:15 switching vxlan tunnel endpoint remote
6:18 command
6:19 and we can see here that we have
6:21 a tunnel coming from 192 168 100.1 which
6:25 is spine1
6:26 and then we can see the vtep interface
6:29 that is associated with it and we do
6:31 have wan vtep under the rv tip mode
6:35 field that's perfect that's what we want
6:37 to see that is the interconnect vxlan
6:39 tunnel and then we have
6:42 192 168 100.13 which is leaf three
6:46 and we can see the rnve
6:48 vtep mode or rv tip mode
6:51 and so that's a normal vxlan tunnel
6:53 that's exactly what we want to see so
6:55 let's jump to leaf three and just take a
6:56 quick look there show ethernet switching
6:58 vxlan tunnel endpoint remote
7:01 and perfect see that rnv e
7:04 and we can see it's coming from
7:06 spine2 and of course the vnio5010
7:10 and so things look really good there
7:11 it's exactly what we should see
7:14 okay so with that let's go ahead and
7:17 look at these uh vtep interfaces so
7:20 clear
7:21 in our clear statistic our interface
7:24 statistics all
7:25 and get rid of any sort of
7:28 information that and so we can start
7:30 fresh and so then let's do the show
7:32 interfaces vtep
7:34 and recall that it's vtep32769
7:37 and we see that here
7:39 here's the interface and we see input
7:42 and output packets going in and out of
7:44 that tunnel that's what exactly what do
7:46 we want to see
7:48 and we can run that command again and we
7:50 can see that output is incrementing and
7:53 then if we jump to spine two
7:55 throw interfaces v temp actually let's
7:57 clear the statistics first clear
8:00 interface statistics all
8:03 then show interfaces vtep and with this
8:05 it's
8:07 vtep32770 and vtep327
8:13 and we can see these interfaces we can
8:15 see we have input and output packets
8:19 on both those interfaces we can run that
8:21 command again and see that those packets
8:24 those counters are incrementing that's
8:26 perfect that's what we want to see and
8:29 we can look at spine1 to verify that as
8:38 well and we can see here that we do have
8:42 packets incrementing that looks great
8:44 for those vtep interfaces
8:47 and one other thing i do want to point
8:49 out that i kind of forgot before is the
8:50 vx lan endpoint address you can see that
8:54 here you can see that this is for spine
8:56 two and this interface is for leaf one
9:00 and so that looks good
9:02 we see that incrementing and we could
9:03 jump to leaf one we would have very
9:05 similar output actually let's just do
9:07 that real quick
9:12 and then let's do the show
9:14 interfaces vtep
9:16 you can see here that we do have we can
9:18 see that the vx
9:21 lan endpoint address is for spline one
9:23 we see that the packets aren't
9:24 incrementing that looks good
9:26 and so great so things look good there
9:29 and so let's jump back to spine1
9:32 and in spine1 let's do the
9:35 show route evpn
9:39 mac address so this is going to be the
9:41 mac address of host one
9:48 and we can look at the route table here
9:50 and see that we are getting routes for
9:52 that mac address
9:53 and we see that in the
9:55 bgpevpn.0 table as well as the default
9:58 switch evpn.0 table that's perfect
10:00 that's exactly what we want to see and
10:04 something else we can look at is the
10:06 see the show route
10:08 basically same command let's do the
10:10 extensive output though and then we're
10:12 going to match on communities
10:16 and helps if i put match in there first
10:21 and we can see the communities that are
10:22 coming through now we see this target
10:24 colon one colon one two three that is
10:26 the inter connect community
10:28 and then we see the target 65
10:32 colon one that is the community that is
10:36 added to the default switch
10:38 configuration and so we should be seeing
10:40 both of those communities show up for
10:42 or in this output
10:44 and then we can uh
10:46 we can uh match on the esi value
10:52 we can see here actually let's
10:54 get rid of
10:56 zero zero colon zero zero
10:59 and we can see here that this route is
11:01 getting the
11:03 uh
11:03 the esi value of that interconnect esi
11:07 from spine1 so that's what's being added
11:09 to the route
11:10 and that route is then being passed on
11:11 to spine2
11:14 and
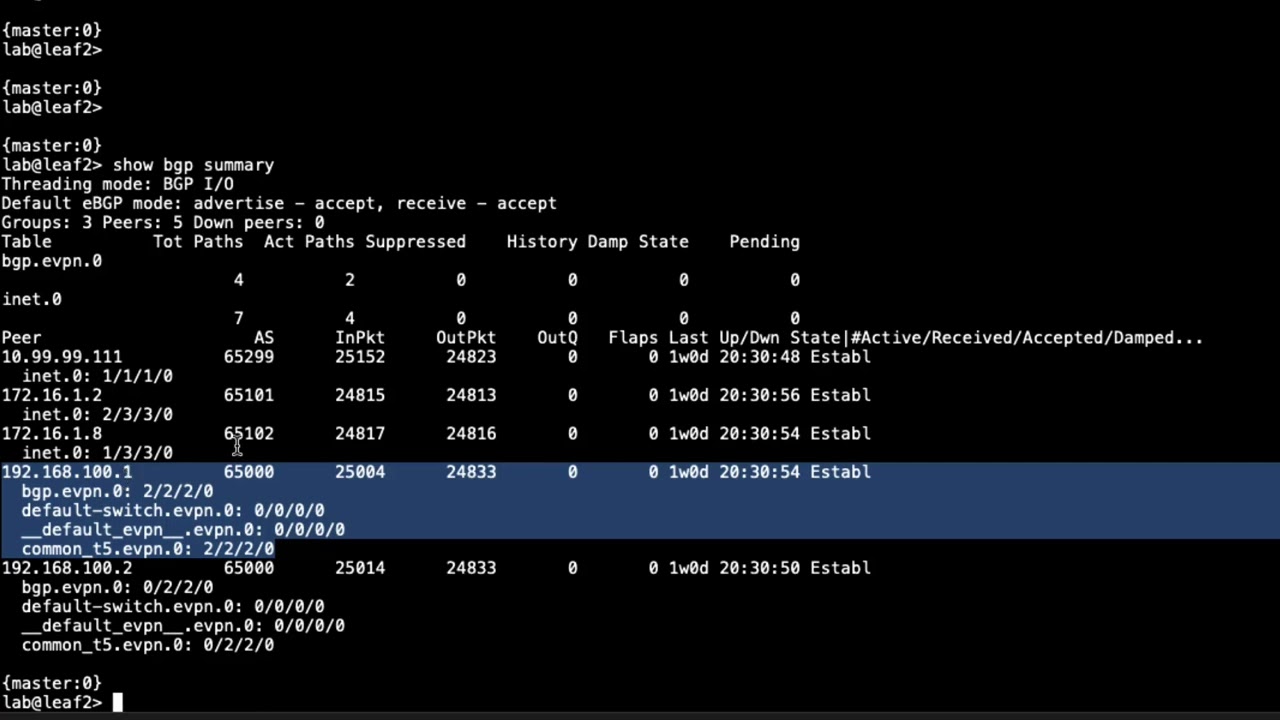
11:15 let's see what next should we look at
11:17 let's uh let's go to leaf two and run
11:19 some of those not leaf two sorry let's
11:21 go to spine two and run some of those
11:23 same commands
11:24 so let's do the show
11:27 route evpn
11:28 [Music]
11:30 mac address and type in
11:33 that mac for host one
11:38 you can see here we have routes and the
11:41 uh the bgpe vpn0 and the default switch
11:44 ev pin.0 route tables it's perfect
11:48 that's what we should see
11:49 and then we can look at the extensive
11:52 command and match on
11:55 esi
11:57 and you can see here the esi values
11:59 you're seeing and this so this is
12:01 from
12:02 the
12:04 spine one and this is the esi for spine
12:06 two
12:09 and then we
12:11 another helpful
12:13 output to look at and it's going to be
12:15 the show ethernet switching flood
12:19 instant this is going to show our mesh
12:21 groups instance so we're going to say
12:23 default switch
12:26 and you see the different mesh groups
12:28 here and you can see the underscore
12:30 underscore ves and the underscore
12:32 underscore when flood mesh groups and
12:35 the ves mesh group is for the local dc
12:39 so it'll be
12:40 uh spine 2 to uh
12:43 leaf 3 and then the wan flood is for the
12:47 interconnect okay next a good command to
12:49 help verify things here is the evpn
12:53 uh instance
12:54 default switch again
12:56 extensive and we're going to match on
12:59 dci
13:00 and you can see in here that
13:02 we're getting
13:04 routes from 192.168.1
13:06 which is spine1 and we see a one mac and
13:09 ip route
13:10 uh two auto discovery routes and that's
13:13 good that's what we should be seeing
13:15 there
13:16 and then another command we can do the
13:18 show
13:19 evpn instance dci command and this will
13:23 give us some information on what's
13:25 actually being passed
13:27 and what the evpn interconnect and you
13:30 can see here we have the route
13:31 distinguisher and so this is spine two's
13:33 route distinguisher for the interconnect
13:36 uh route distinguisher and then we have
13:37 the import vrf import and the vr export
13:40 and we could look at those policies and
13:42 what that'll show it's just showing that
13:44 it's importing routes based on the vrf
13:47 target which is this target here
13:50 and that's we're using for the vrf
13:52 import and export
13:54 and so you would actually see that in
13:56 those policies themselves and something
13:58 else is the show evpn
14:01 database command
14:04 and here you can see
14:05 what we're getting we can see the
14:08 the vni we can see the mac address
14:11 so this is this one here is the mac
14:13 address for host 2. we haven't looked at
14:14 that one yet but we can see the active
14:16 source is
14:18 the loopback ip address for
14:21 leaf 3
14:22 and we can see the ip address and this
14:24 is host 2's ip address and then with
14:26 host 1 we see the mac address and then
14:28 we see under the active source we see
14:31 that
14:32 interconnect esi
14:34 that is configured on spine1 and then
14:36 you see the ip address for
14:39 host 1 there and then
14:41 another good command would be the show
14:44 evpn database mac address and let's use
14:47 host 2's mac address i'm just going to
14:50 copy it here
14:55 extensive
14:57 and you can see in here that we have
14:59 first of all we have dci created route
15:01 so this is a route that is going to so
15:03 spine2 is going to advertise this to
15:05 spine1 and it's going to be over the dci
15:08 so that's very important because if we
15:10 run that same command
15:12 for
15:13 uh the mac address for host
15:17 one
15:19 we'll see a little bit different output
15:22 we can see dc created route
15:25 and that means it was is local to the
15:27 local dc so that makes sense because
15:30 spine 2 to get to it to get to host 2
15:34 it just uses a normal ex v or vx land
15:37 tunnel
15:39 so that does bring us to the end of this
15:40 learning byte in this learning byte we
15:42 demonstrated how to verify seamless evpn
15:44 vxlan stitching operation so as always
15:47 thanks for watching
15:50 visit the juniper education services
15:52 website to learn more about courses
15:55 view our full range of classroom online
15:58 and e-learning courses
16:00 learning paths
16:02 industry segment and technology specific
16:04 training paths
16:06 juniper networks certification program
16:09 the ultimate demonstration of your
16:11 competence and the training community
16:14 from forums to social media join the
16:16 discussion
16:23 you