Configuring a Data Center Overlay - IBGP

Juniper Learning Byte: Zach Gibbs on how to configure a data center overlay – IBGP
In this Juniper Learning Byte, Zach Gibbs walks you step by step through the process of configuring a data center overlay –– IBGP.
This video is most appropriate for users who are already familiar with data center technologies. It’s relevant to OS releases Junos 21.3R1.9 or later and Juniper platforms QFX Series, MX Series, and EX Series.
Check out Juniper Education Services to learn more about our full range of courses available online.
You’ll learn
An example typology with five devices
Helpful tips, such as always set the type to internal so it doesn’t default to external
One example of what might go wrong and how you can fix it
Who is this for?
Host
Transcript
0:00 [Music]
0:12 hello my name is zach gibbs and i'm a
0:15 content developer within education
0:17 services inside juniper networks and
0:20 today we will be going through the
0:21 configuring a data center overlay ibgp
0:24 learning byte
0:26 all right so here is our topology here
0:28 in this topology we have five devices we
0:31 have spine one spine two leaf one leaf
0:33 two and leaf three
0:35 and since we're using ibgp they will all
0:38 be using the same autonomous system
0:40 number for the ibgp pairing sessions so
0:43 that number of 64665
0:47 for the autonomous system number is
0:49 marked there on the topology on each
0:51 device
0:52 and then the loopback addresses which
0:53 are already being passed around by the
0:56 underlay network which is in our case
0:58 ebgp is shown on the left we see spine1
1:01 that uses 192 168 100.1 spine 2 uses dot
1:06 2. leaf 1 uses dot 11 leaf 2 uses dot 12
1:09 and leaf 3 uses dot 13 and spine 1 and
1:12 spine 2 will also be acting as route
1:14 reflectors and spine 1 will be using the
1:17 cluster id of 10.1.1.1
1:20 and spine2 will be using the cluster id
1:22 of 10.2.2.2
1:24 so with that being said let's go ahead
1:26 and jump to the cli and get this going
1:29 all right so here is the cli for spine
1:31 one let's go ahead and go to protocols
1:33 bgp
1:34 and have a look what we have here and
1:35 you can see here we do have the underlay
1:37 configuration that is on spine1 as well
1:40 as the other devices in our little data
1:42 center here so let's go ahead and jump
1:44 into group
1:46 dc
1:47 overlay
1:49 and let's go ahead and configure this so
1:51 let's first set the type to internal if
1:53 we don't set a type it'll default to
1:55 external and we don't want that
1:57 and then let's go ahead and set the
1:58 local address that's going to be the
2:00 loopback address of spine1
2:02 then we also have to set the cluster id
2:05 and that's going to be 10.1.1.1 and
2:07 recall that spine1 is a route reflector
2:10 and then we need to set the neighbor
2:12 parameters and so we'll set neighbor
2:16 102.168.100.2 that is spine2 and then
2:18 we'll set
2:20 11 that's leaf 1
2:22 2
2:23 or rather 12 is leaf 2 and 13 is leaf 3.
2:28 so we can see the configuration there
2:30 that looks good let's go ahead and
2:31 commit that configuration and i'm going
2:33 to copy this
2:35 and paste it into spine two and make a
2:37 few adjustments to save on some time
2:39 here so let's go to protocols bgp group
2:42 dc
2:43 overlay
2:46 we'll load this in
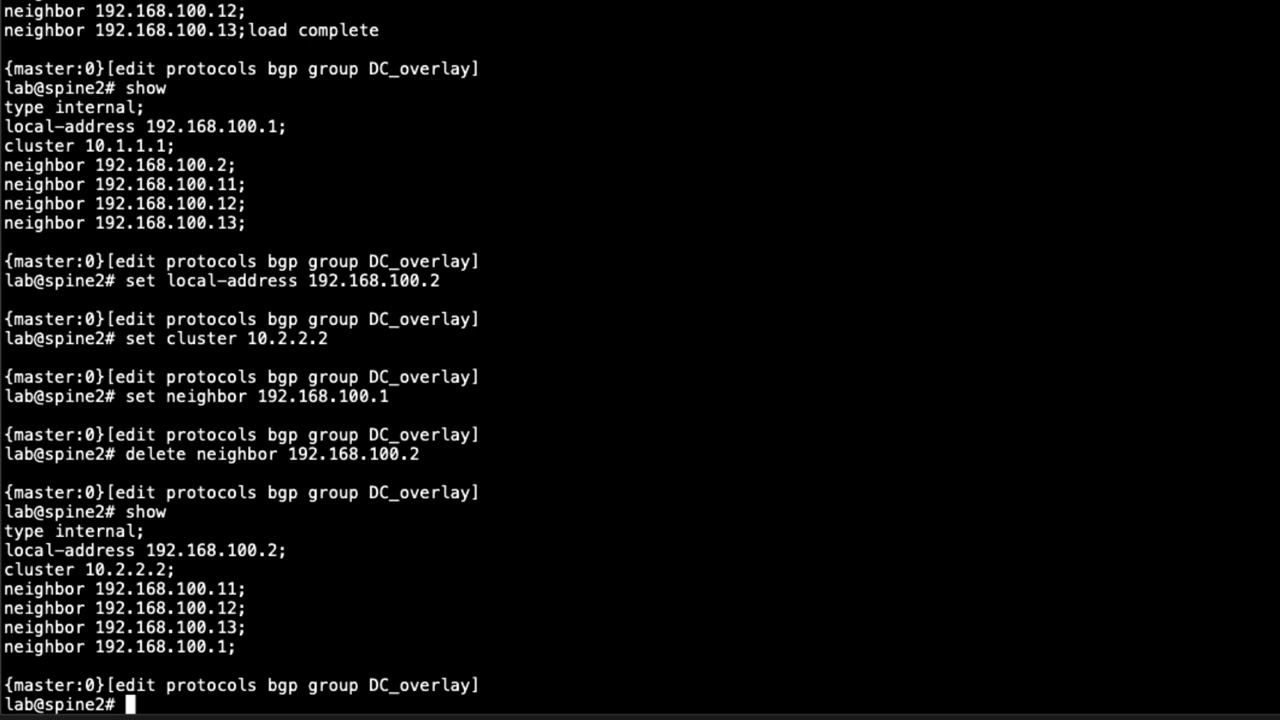
2:50 you can see the configuration here now
2:51 we need to change a few things first of
2:52 all the local address needs to be the
2:55 loopback address of spine2 and then we
2:58 need to change the cluster id to
3:01 10.2.2.2
3:03 and then we need to
3:05 set the neighbor
3:06 to set uh
3:08 spine1 as a neighbor
3:10 and we can delete
3:13 spine2 as a neighbor since we are
3:15 already on spine2 now if you were to
3:17 leave spine two
3:19 in there
3:20 in the configuration that is the
3:21 neighbor of spine two the loop back
3:22 address of spine two on spine two it
3:25 wouldn't hurt anything i like to remove
3:27 it just to keep a clean configuration
3:28 but if you're doing something say a an
3:30 expert level lab exam
3:32 i would just leave it in you know time
3:34 is over the essence with those things so
3:36 i would uh not take it out i would copy
3:38 and paste as much as possible so in that
3:40 instance you could leave it in it
3:41 wouldn't hurt anything but with what
3:43 we're doing here i want to remove it
3:44 just to keep a clean config so let's go
3:46 ahead and commit that
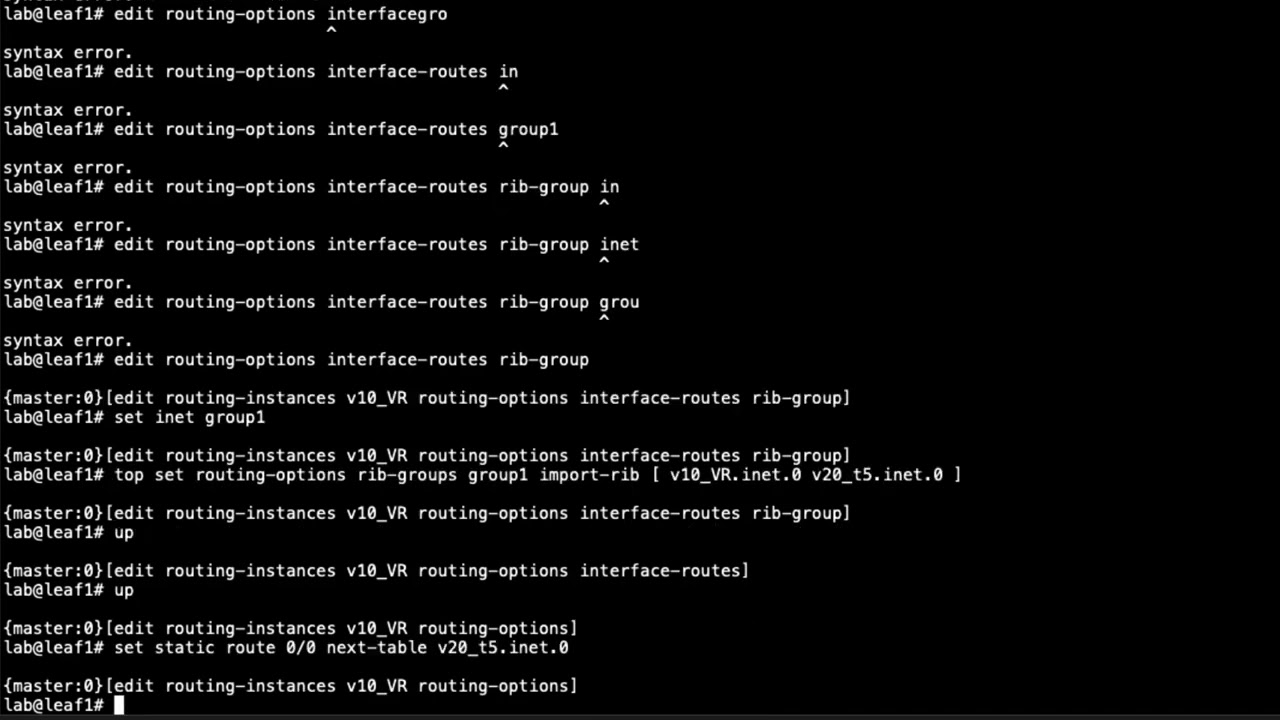
3:48 and then let's jump to leaf one now this
3:51 is going to be a little different since
3:52 the leaf is not a route reflector we
3:55 only need to set a pairing sessions or
3:57 two pairing sessions with spine one and
3:58 spine spine2 so we'll go to bgp
4:02 group dc
4:04 overlay
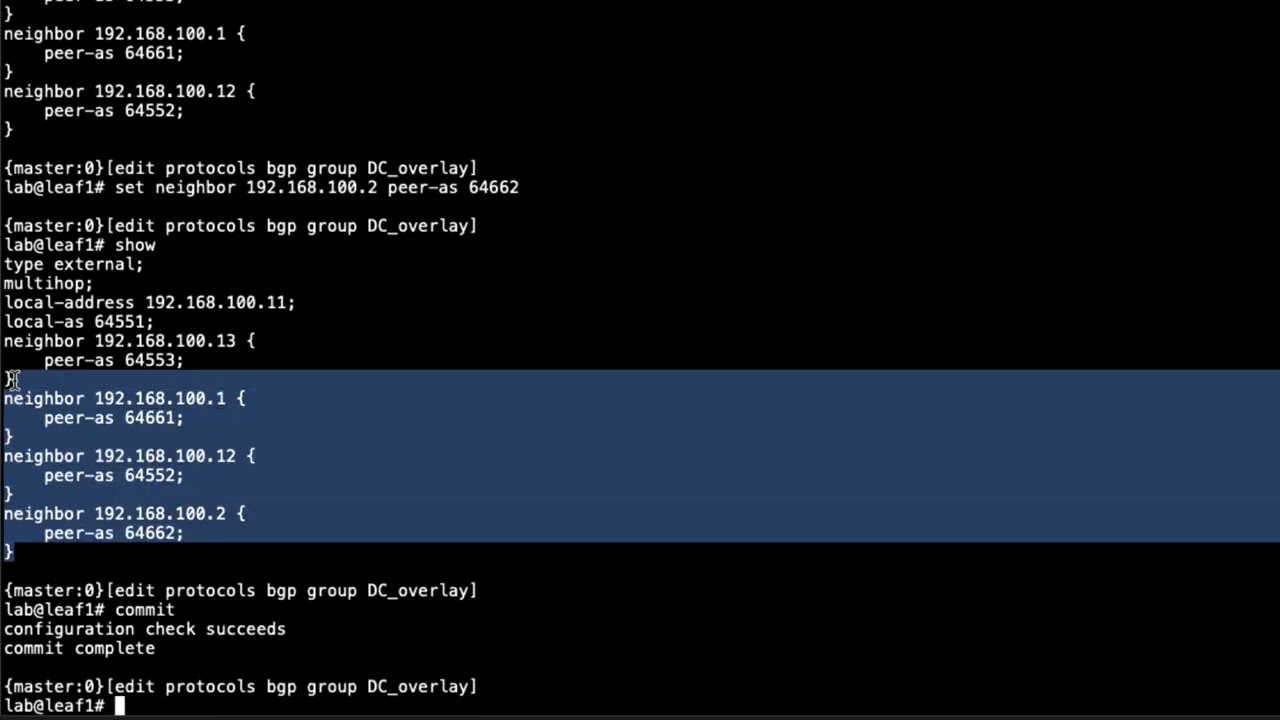
4:06 and we'll set the type to internal
4:09 local address to
4:11 102.168.100.11 that is the loopback
4:13 address of leaf one and then we'll set
4:15 the neighbor to
4:16 192.168.100.1
4:20 that would be spine one and then we'll
4:22 set the other neighbor to dot two which
4:25 is spine two and one other thing that
4:26 did forget on spine one spine two is we
4:28 need to set the local as that six four
4:31 six six five now there is an autonomous
4:34 system already set in the routing
4:35 options but it's different than what we
4:36 have here so let's go ahead and set that
4:38 there i'll commit that we'll jump back
4:39 to spine one
4:41 and do the same
4:44 set the as64665
4:48 commit that and here spine 2 will do the
4:50 same
4:52 set the local as to 64665
4:56 and commit that
4:58 and then we'll go back to leaf one and i
4:59 want to grab the configuration from this
5:02 because we'll be able to copy and paste
5:04 that in on leaf two and leaf three to
5:05 save some time
5:15 all we have to do here is change the
5:17 local address
5:21 do the loopback address of two
5:24 and then we'll jump to leaf three and do
5:26 a similar configuration
5:40 and let's commit that configuration
5:44 and then let's jump back to spine1 and
5:46 have a look at the vgp sessions
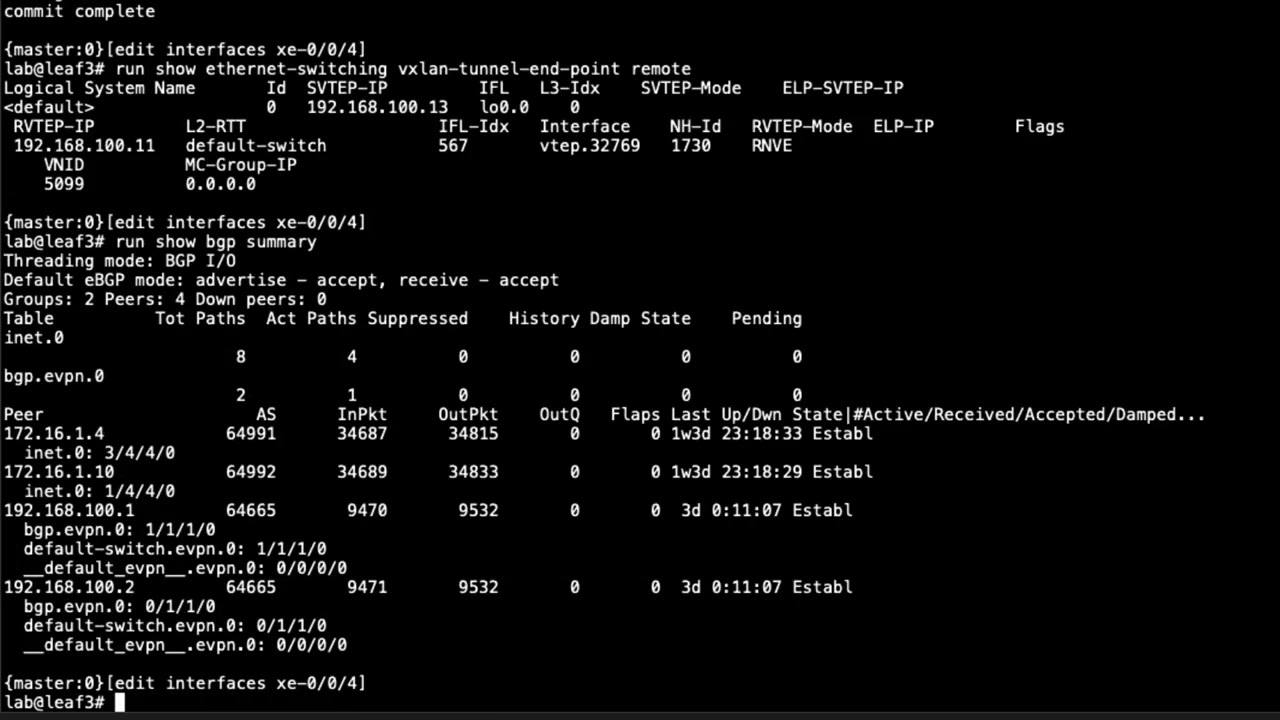
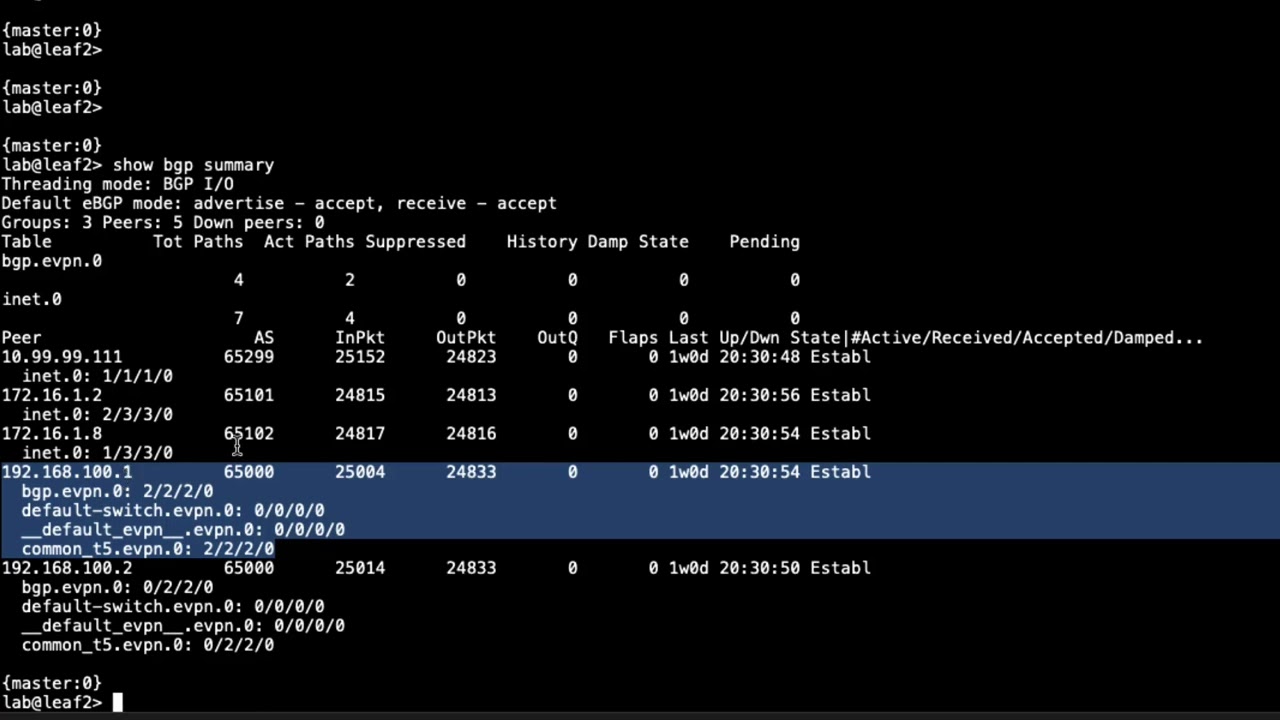
5:52 you can see here that all the bgp
5:54 sessions are in the established state we
5:56 have these three sessions that are part
5:59 of the underlay and then we have these
6:01 four sessions which are part of the
6:03 overlay and so that's great we have
6:05 everything established but there is a
6:07 problem here and i left this out on
6:08 purpose because i wanted to make a
6:10 specific point on uh what's going wrong
6:13 or what we need to do next you can see
6:15 here that we're passing inet routes
6:16 we're passing ipv for routes and that's
6:19 not what we want for an overlay network
6:20 in a data center we want to be able to
6:22 pass evpn routes and so we need to make
6:24 a change we set family evpn
6:28 signaling and commit the configuration
6:30 and we need to do that on all devices
6:32 here so set family evpn signaling
6:36 give me the configuration that's fine
6:37 two let's do this on leaf one
6:39 set family evpn signaling
6:42 commit set family evpn signaling commit
6:45 that
6:46 and set family evpn signaling and commit
6:49 that
6:51 and then let's jump back to spine1 and
6:52 see what we have
6:56 we see the vgp summary output we have
6:59 the sessions established and instead of
7:01 inet.0 we're seeing bgp.evpn.0
7:05 and that's exactly what we want to see
7:06 the overlay network is set up to pass
7:09 evpn routes
7:11 and there's no routes right now because
7:13 we don't have any vxlan parameter setup
7:15 nothing with evpn setup so we're not
7:18 passing any evpn routes yet but those
7:21 are topics that i'll save for another
7:22 learning byte so watch out for that as
7:24 well
7:25 and so with the overlay network we have
7:27 everything configured and working
7:29 exactly how we want to have it
7:32 so this does bring us to the end of this
7:34 learning byte in this learning byte we
7:35 demonstrate how to configure and verify
7:37 ibgp in a data center overlay network so
7:40 as always thanks for
7:42 watching visit the juniper education
7:45 services website to learn more about
7:48 courses
7:49 view our full range of classroom online
7:52 and e-learning courses
7:54 learning paths
7:56 industry segment and technology specific
7:58 training paths
8:00 juniper networks certification program
8:03 the ultimate demonstration of your
8:04 competence and the training community
8:07 from forums to social media join the
8:10 discussion